Most of this series will be a look into storage options in different areas of the boat. Today’s will be a little different. It’s all about making a spice rack. Easy, practical- a great DIY project!! I’ll give you a materials list and an overview of how I put mine together. It’s a lovely way to organise your kitchen spices, plus an attractive kitchen feature.
Materials
(Links are suggestions, we have no affiliation to any of the companies listed and receive no payment for click throughs or orders)
Jars
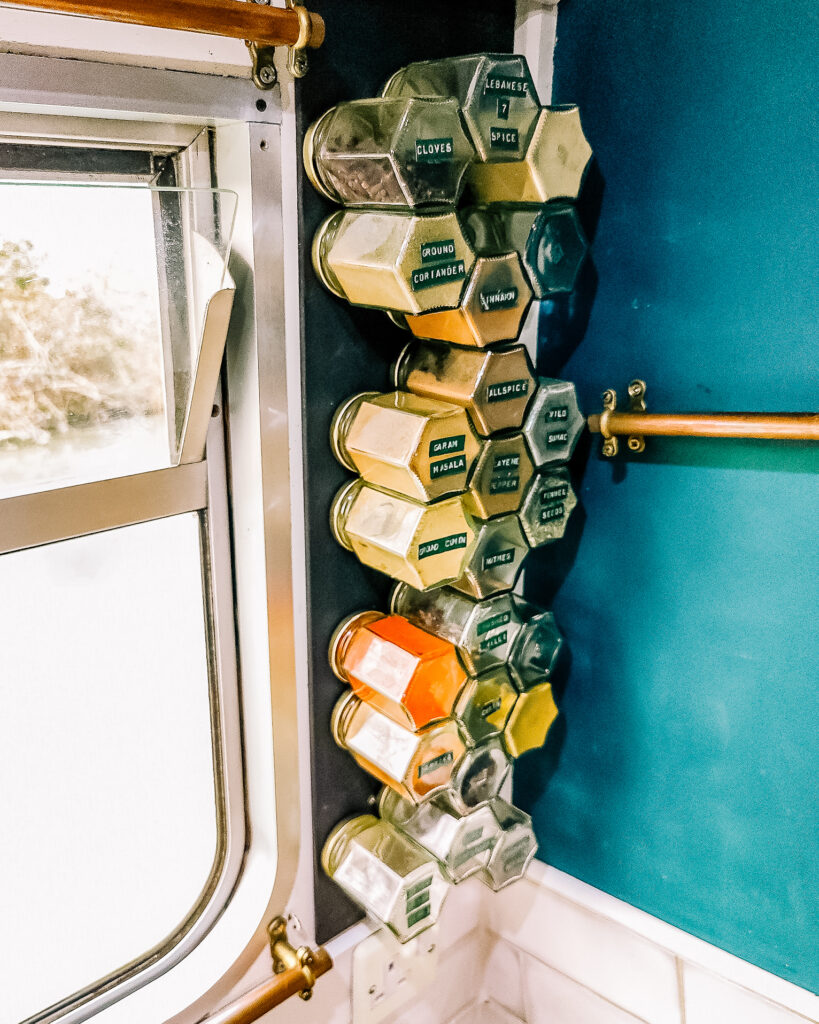
I love the honeycomb jars, they tesselate well and make interesting patterns. However, any clean, food safe small jar with a metal lid will do. Plastic lids might work, I haven’t tried it. You want a jar of around 190ml, but you can use bigger/smaller jars to suit your needs.
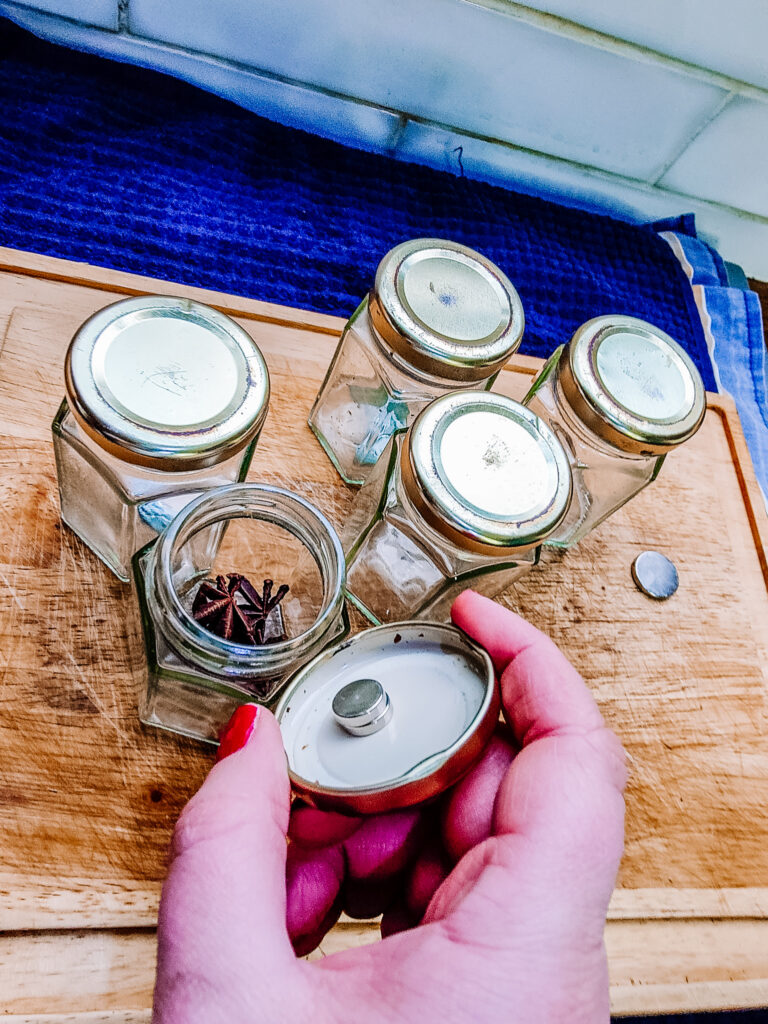
Getting the strength right is key. I used neodymium magnets, they are stronger for their size than ferrite magnets and less brittle too. Around a 3-5kg pull strength is ample.
Any magnet (ferrous) material. I used a piece of metal sheet I got from our Blacksmith neighbours. You can get steel or iron sheet online and cut to size, or find something to repurpose. How about an old iron skillet? It maybe possible to stick the jars directly to a fridge, cooker hood or other metal surface.
Be aware that not all stainless steels are magnetic!
My partner has a vintage Dymo label maker from her grandparents which made our gorgeous labels. If you have a label maker then great, but it’s not essential. You can write paper labels and tape them on or use a marker that will write on glass. The latter may rub off with time.
Fixings / Adhesive
If you are mounting a backing board to the wall or a cupboard then you will need to fix it off. A combination of grab adhesive and screws will be nice and strong. Most narrowboat walls are wooden so you can screw straight into them (Mind Cables!!). To drill metal you will want a 4mm HHS bit for a clearance hole and a 8-10mm HSS bit to countersink the hole.
Tools
(suggested, but not all essential)
Drill and drill bits
Screwdriver
Adhesive applicator gun
Label maker
Method
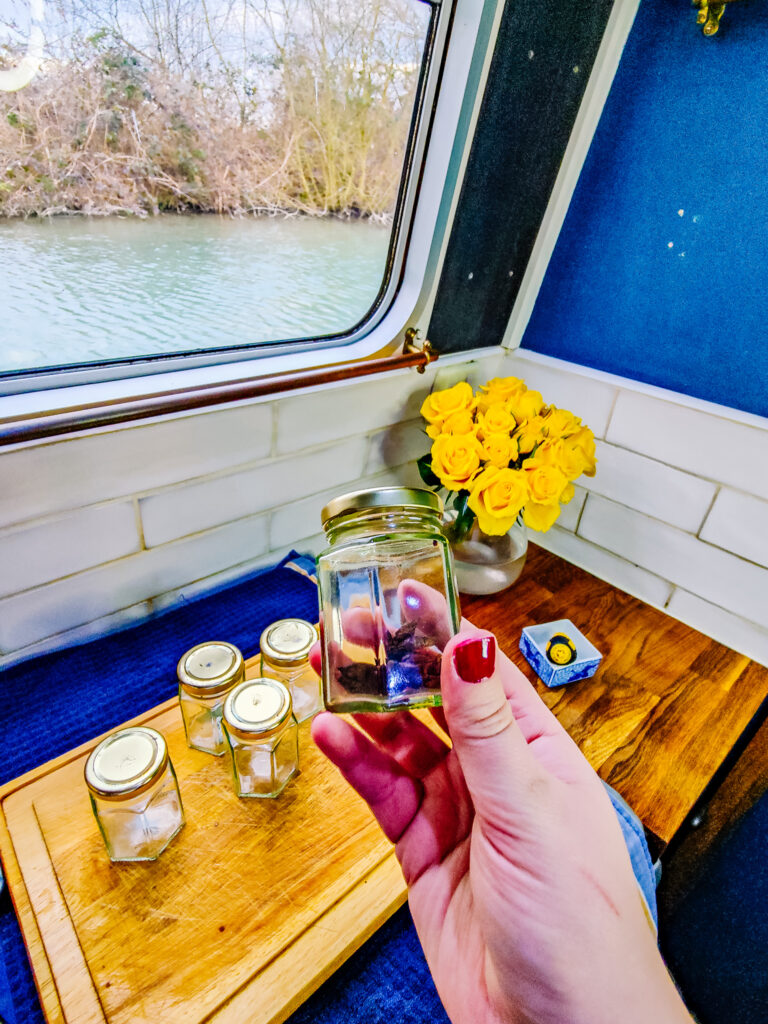
Once you have all your materials it couldn’t be simpler. Put a magnet into the lid of each jar. Use two if they are too weak. They stick to the inside of the lid and the jars will now stick to your backing board/fridge/cooker hood.
To mount a metal backing board I drilled holes and then countersunk them. You need HHS metal drill bits to drill a clearance hole and then countersink so the screw heads don’t stick out too far. I used a little grab adhesive on the back to be belt and braces, though a screw in each corner will likely be sufficient. You can screw straight into the walls of most narrowboats as they are typically ply or MDF. Make sure to check for pipes and cables beneath. I would suggest not using screws longer than required.
Label up each of your jars with your chosen labelling method. Putting the names on the bases makes it easy to see what is in each jar and avoid any culinary surprises! You can make these as elaborate and ornate as you care to.
Finally, decant your spices and arrange in a pleasing pattern. It is good to leave a few gaps so that you can get fingers in to grab them.
I hope that you have found this guide helpful. Why not have a go at making one for your kitchen. If you do, then tag us #cluettcarpentry
A bulkhead is a nautical term to describe any vertical wall that isn’t the hull/cabin top. These may be structural, or merely a way to compartmentalise internal space. As boats become more open plan, we tend to have less walls dividing the space but they are always a significant square footage of surface area. You can maximise the storage capability of your boat by making use of the bulkheads.
In this blog I will go through some good ways to use the space. A lot of this is things you can buy or make at home. You don’t need to be an expert to make the most of bulkhead walls. So, if lack of storage is driving you up the wall, then read on!
Space: Bulkheads
Size: Widely varied. Generally half or full height (900mm or 1800mm) tall. Widths from 400mm to 3000mm
Type of storage: Shallow storage. Good for pre-made items as it’s typically vertical. Shelving, hanging and racking. Nothing that sticks out too far
Suitable for: Books and trinkets, but also great for hanging kitchen items and such. Coats, bags and boots. It is also useful for ‘active’ use, like a draining rack. It’s a dry internal area, so anything that will fit
Materials: Almost anything, especially if it is off the ground. Damp shouldn’t be an issue so pretty much anything goes
Difficulty rating: Very easy. The flat vertical surface lends itself to almost anything you would do in a home so “off-shelf” items will readily fit, as well as being prime for upcycling and DIY
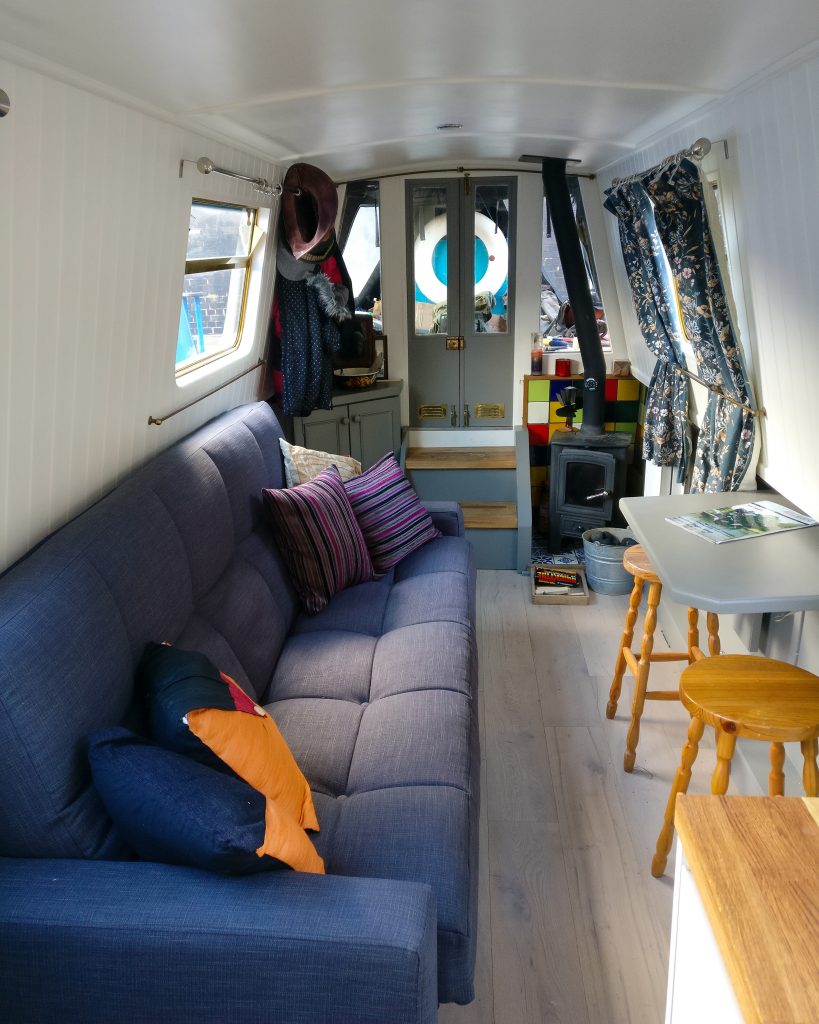
After the cat, I think one of our favourite things on the boat is the draining rack. My partner found it on eBay and it revolutionised our washing-up. It’s small. Only a couple of square feet. It can hold an amazing amount of crockery and cutlery though. For a fairly cheap internet purchase it has made the space in the kitchen feel so much bigger. It’s wall mounted and has a drip tray underneath so we don’t lose any worktop space. With three tiers it can hold loads. A really handy addition.
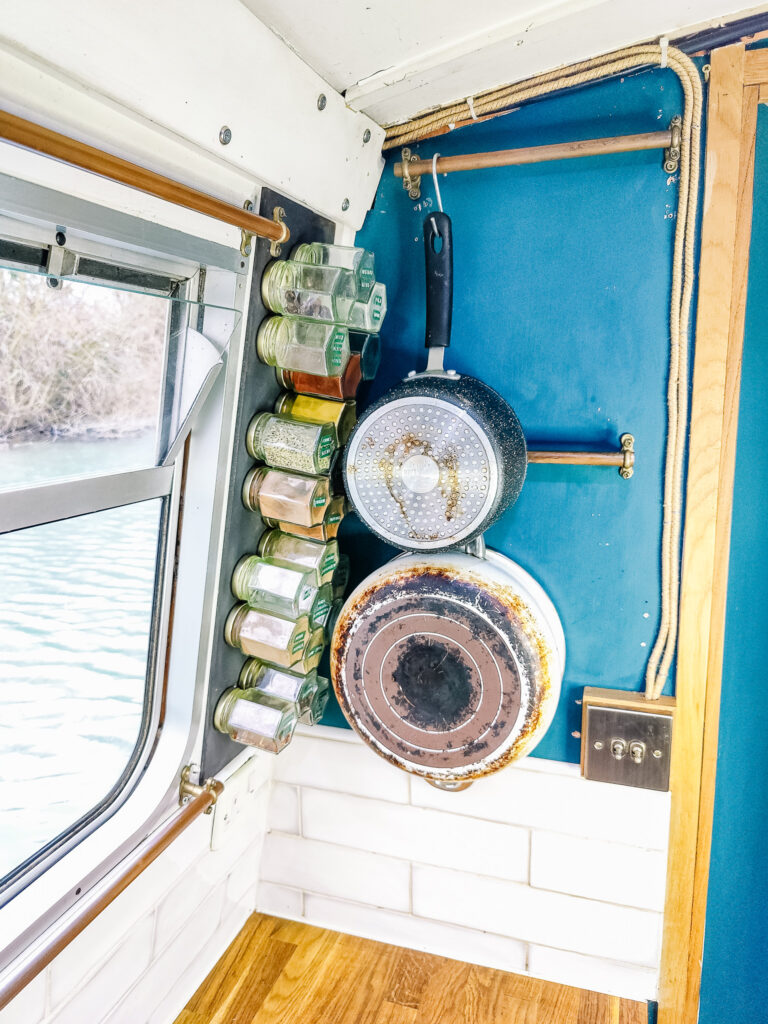
On the other side of the kitchen we have more bulkhead storage. This is simple. The idea is the same as our curtain rails. Copper pipe and Munsen clips. A touch more advanced on the DIY front, but still an easy beginner job. Hanging items is great for pans, spatulas, sieves etc. This takes a lot of clutter off the side and can be more flexible than shelving, with large items hanging vertically. If you hang some baskets off them you could put pretty much anything here. Elsewhere in the boat we have used the same idea to hang our kindling basket, hats and gloves basket, you could even have a cat basket for your feline friend.
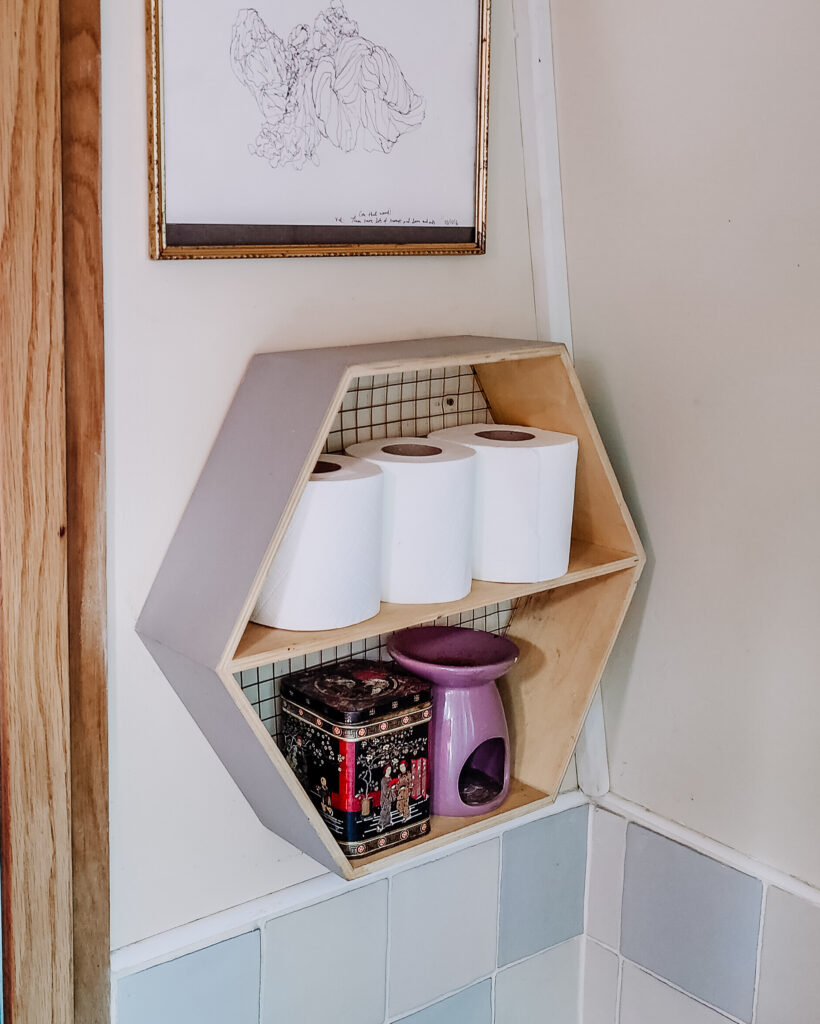
Walls are great for hanging pre-made items to use as storage as bulkheads are mostly plumb. It is easiest when they are vertical walls unlike the sides of boats which can be almost any angle. You can get lots of interesting pieces, very cheaply, and with a few screws you’ve got extra shelves. An example of this on our boat is that we use a cute little hexagon shelving unit from my wife’s old flat to store bathroom items, we have plenty of space to stash toilet rolls and a bottle of room freshener spray. The latter is important when you live in a small shared space. Anything like this can be fitted to the wall for instant storage.
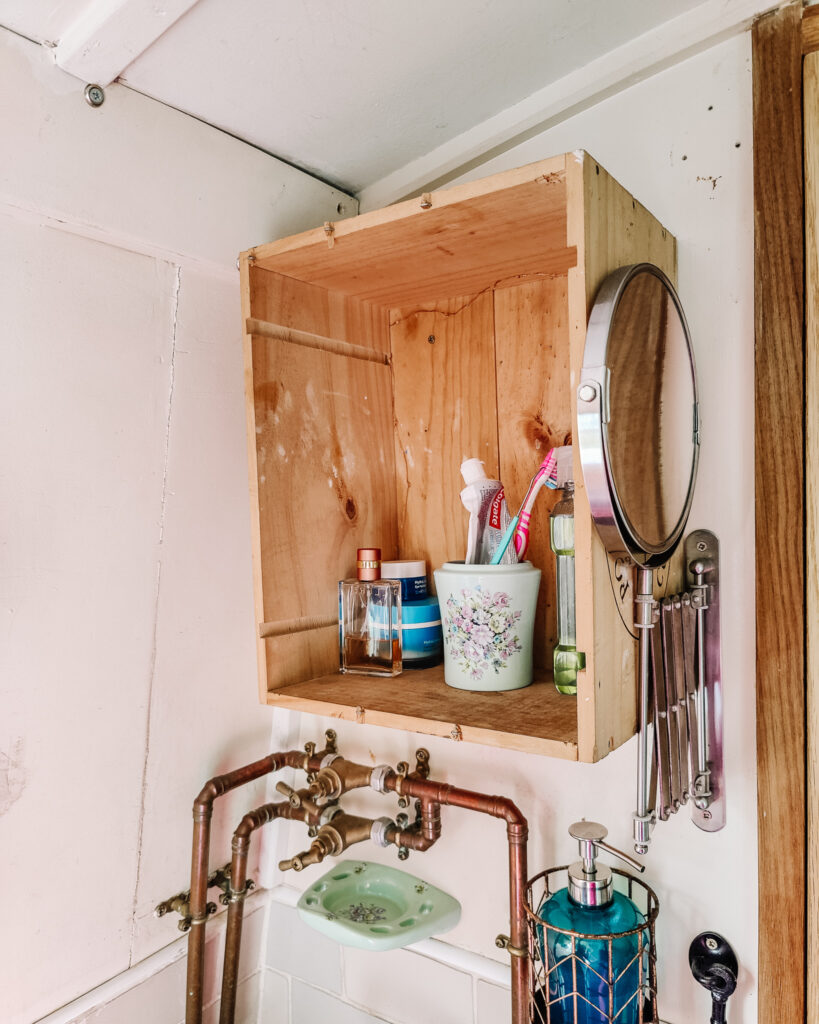
Upcycled items are cheap, fashionable and can add character to a boat. While the inside is our ‘medicine cabinet’ as it were, the top is space to hide away more bits and bobs. Spaces like this this help keep sides clear. A clear side makes a small home feel more spacious. Clutter can be oppressive. We aren’t always the best at keeping things tidy, but having a home for things helps.
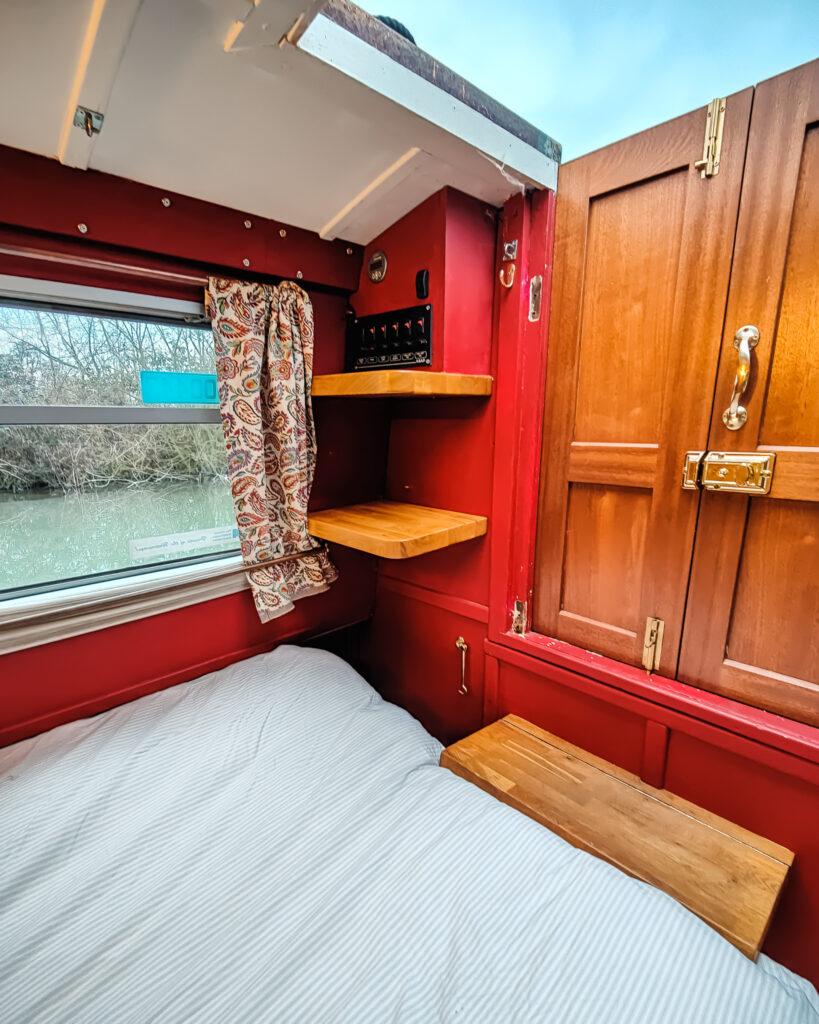
If you have the space for some custom shelving then you can really go to town. Wide beams especially have big open bulkheads. The sky is the limit here. Any material, any design. You can have book shelves, display shelves, even a full home entertainment wall. Open shelving is great, but you could also have cupboards if you have the space. We have two cupboards in the front of our boat. It does take some of our lounge space, but without them we wouldn’t have any hanging space.
In a wide beam then a bulkhead of full height cabinets across the boats can make a real statement, especially in a dark colour. Like a feature wall, but more useful. Using interesting materials can make for some gorgeous pieces. I love industrial and steam punk looks, as well as drawing on the natural beauty of wood and metal. Scaffold board, as made famous by East London coffee shops (excuse the tongue in cheek joke) looks great stained and varnished. It’s a lot cheap than slices of hardwood live edge timber. With some well chosen brackets it looks great. We have also used veneered ply to good effect, finished with a hardwood lip.
There are loads of ways to DIY your bulkhead storage. I think it might be the most approachable off all the spaces in our series. It certainly has a wide spectrum of uses. Why not upcycle some shelving, or plan out an intricate Welsh dresser style steam punk creation from reclaimed timber and oversized copper piping! Make sure you make the most of this prime boat real estate and if you want something really beautiful and practical then why not get in touch, let us design something just for you.
As a cabinet maker we joke that all we do is build boxes. Drawers are just a box in a box, but they can help make the most of limited storage in a boat. What you in the thickness of the drawer and runners, you can in utility as easy access makes it a breeze to use the full depth of hard-to-reach spaces. Plus, it makes organisation satisfying and pretty. If I were building my dream kitchen I would have 80% drawers, cupboards just wouldn’t cut it. They’re great for under-bed storage, beneath dinettes and anywhere you can fit them in around the home.
Space: Drawers
Size:From around 200-300mm wide and 400mm deep, to giant drawers over a metre wide, breakfast bars a metre deep and up to 600-700mm tall
Type of storage:Very varied, though typically not over about 1-1.2 metres in the largest dimensions and often much smaller. Generally shallow, though not always
Suitable for: Anything that isn’t too long and large. Everything for the kitchen, from crockery to cutlery to pantry items. Clothes, shoes, linen. Toys, books, DVDs
Materials: Varied, though Birch ply, clear lacquer and a soft-close undermount runner for preference
Difficulty rating:Medium to hard. Not for amateur DIYers, but very effective done properly
1) Breakfast Bar
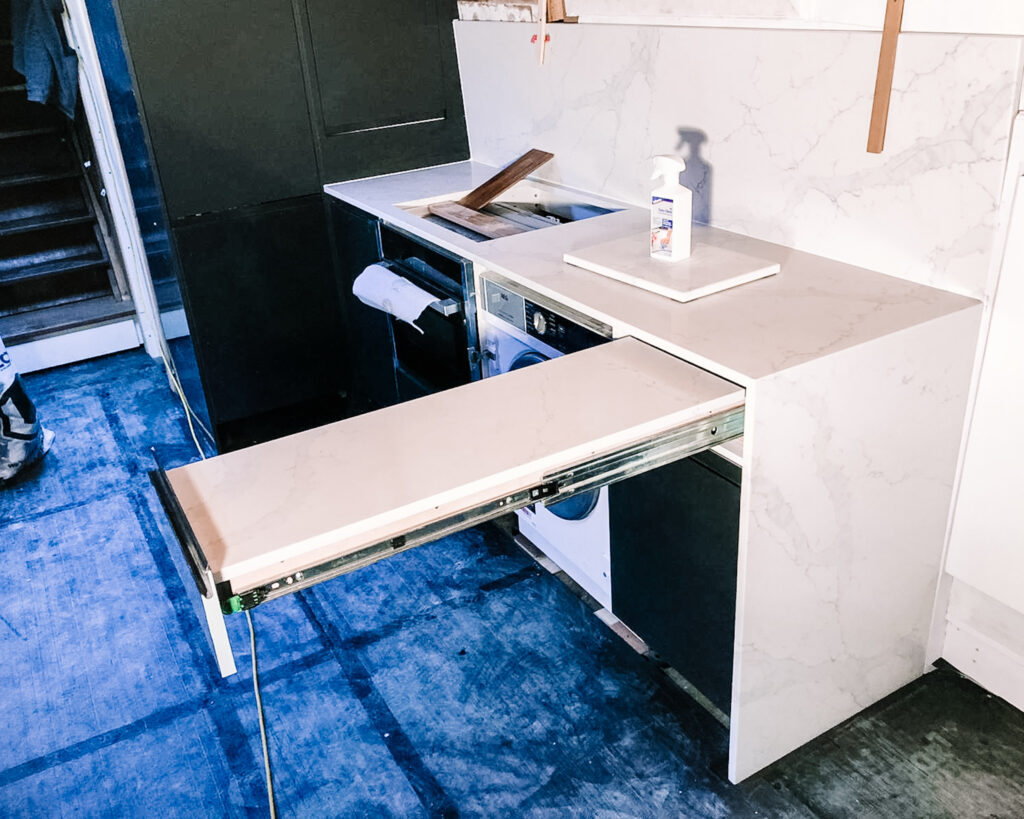
My favourite drawer, though it might be a stretch to call it that, is a breakfast bar we did. It’s 900mm long and marble. The body is birch ply and the runners are heavy duty locking runners, designed for fire trucks and similar. They can take an even load of 250kg! We were able to fit such a deep bar as it is a Dutch Barge and there was a lot of space under the gunwale, behind the kitchen. It gives a big additional kitchen surface and an elegant table for breakfasting with a loved one.
2) Coffee Station
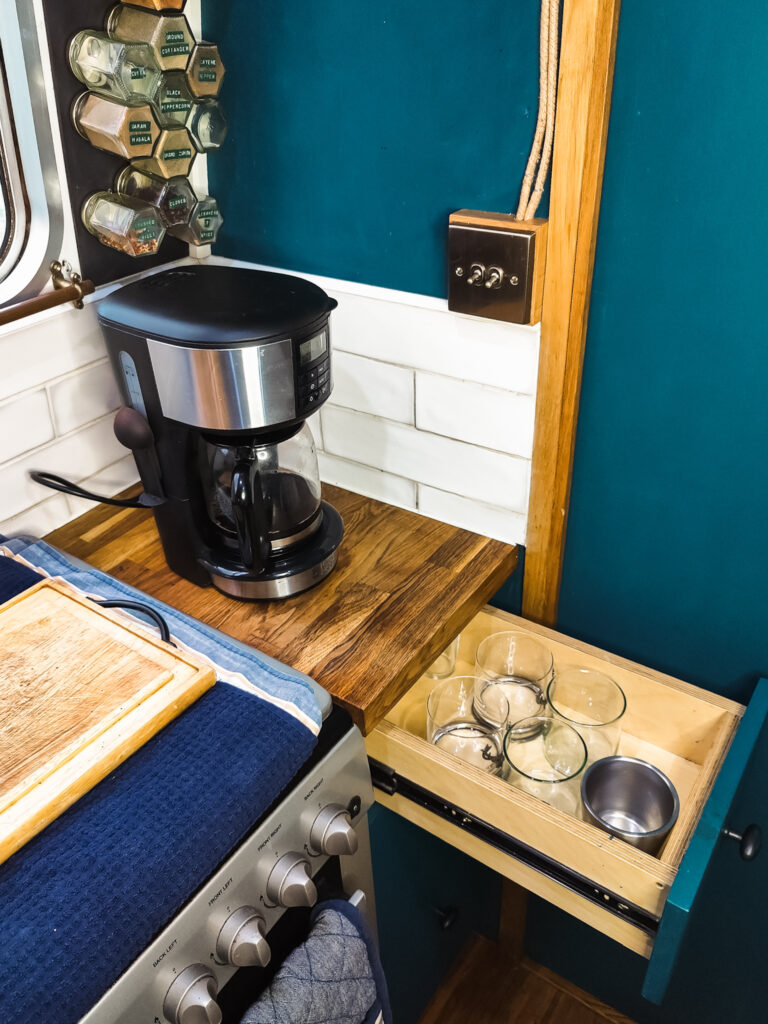
Here we have my coffee station. My partner arranged this and I love it. It is a good example of how a drawer can help organise and beautify. Everything is together; one drawer for mugs, the next for coffee, filters and other supplies. It is very ergonomic and feels great to use.
3) Pull out bin
Drawers are nothing if not versatile. On the other side of the kitchen we have a pull out bin. It is not glamorous. It is very useful though. With two sections to keep general waste and recycling apart it is clean and green. It’s nice to be able to hide the rubbish away and this gives you plenty of space when you are between refuse points, keeping you going as long as possible.
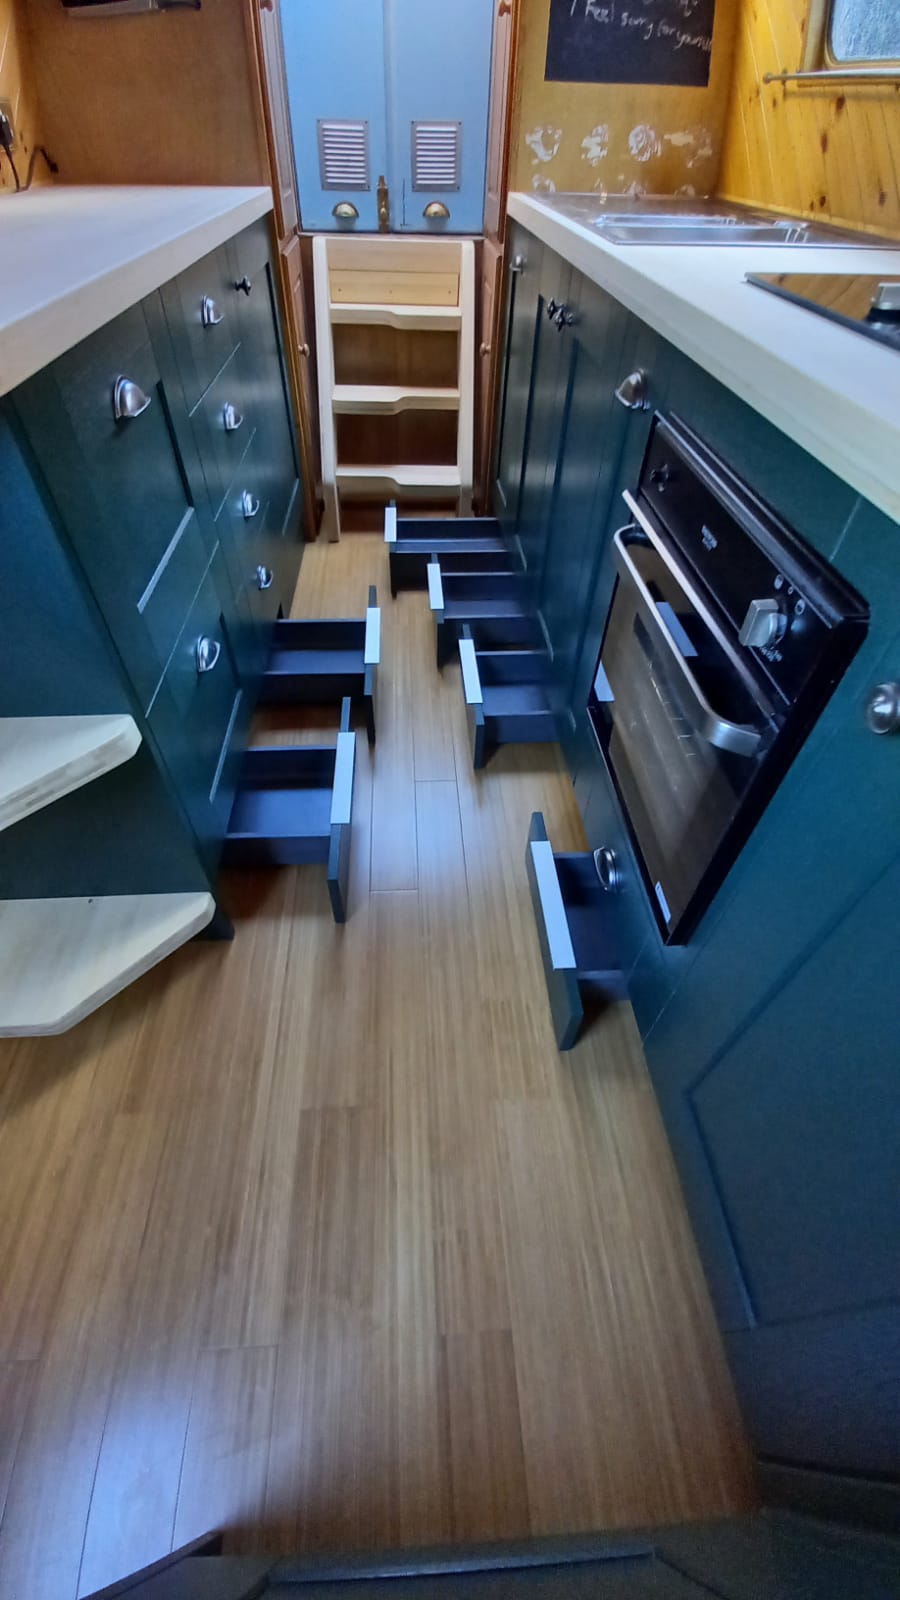
4) Plinth drawers
A relatively new type of drawer, plinth drawers have been growing in popularity. We fit these in pretty much every kitchen we do now. The plinth (the area beneath the units) is dead space and is normally unused. A plinth drawer gives you a space you never knew you had. It is ideal for odds and sods. It also makes an adorable pull out for pet food and water bowls. They can be fitted with most kitchen units and add a good amount of additional storage.
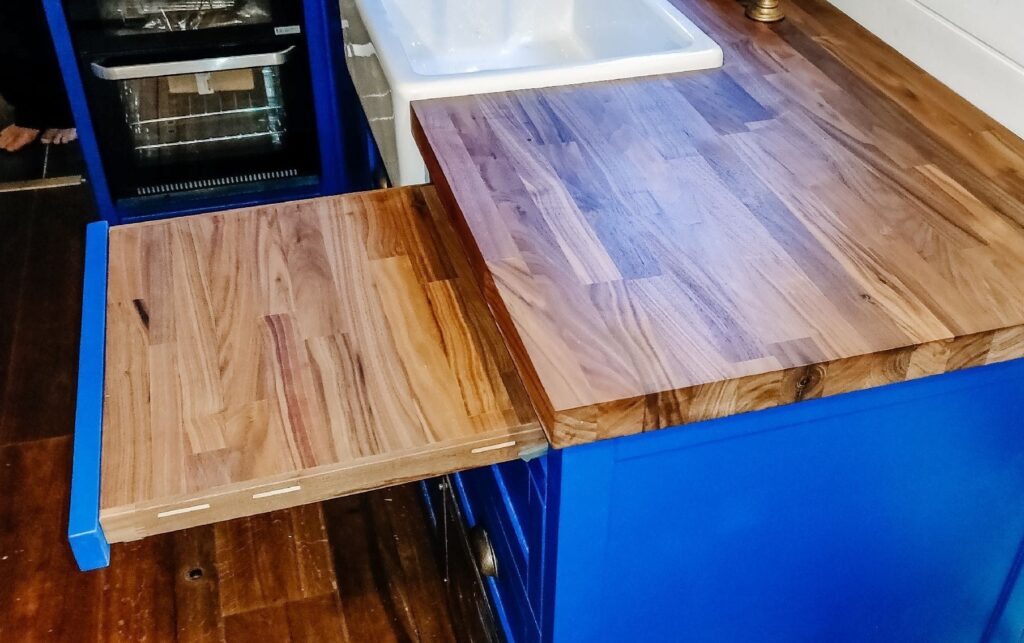
5) Chopping board
Another fun kitchen addition is a pull-out chopping board. It provides extra working space in a tight galley kitchen. It feels good to use and can help you keep things clean and clear while you cook. I’ve seen some with a hole to put a bin beneath for easy clearing of peelings and scraps, something to try on a future project.
All things considered, drawers are a really great way to access deep spaces, keep things organised and make the best use of the space you have. They can be integrated into most pieces of furniture and modern drawers runners are reliable, look great (undermount are effectively invisible) work brilliantly and will last and last. All sorts of spaces, shapes and sizes can be made and with heavy duty ratings on some runners the uses are almost endless. If you want some help getting the most out of the space in your home, then give us a call and let us design and build a gorgeous piece of furniture for you.
Well, the less marine based puns the better, lord knows I don’t want to expose my shocking lack of knowledge of sailing. Carpentry, cabinetry, tiling, boat fitting in general. Of the many things I do know about I must admit that actual sailing, sadly, is not one of them.
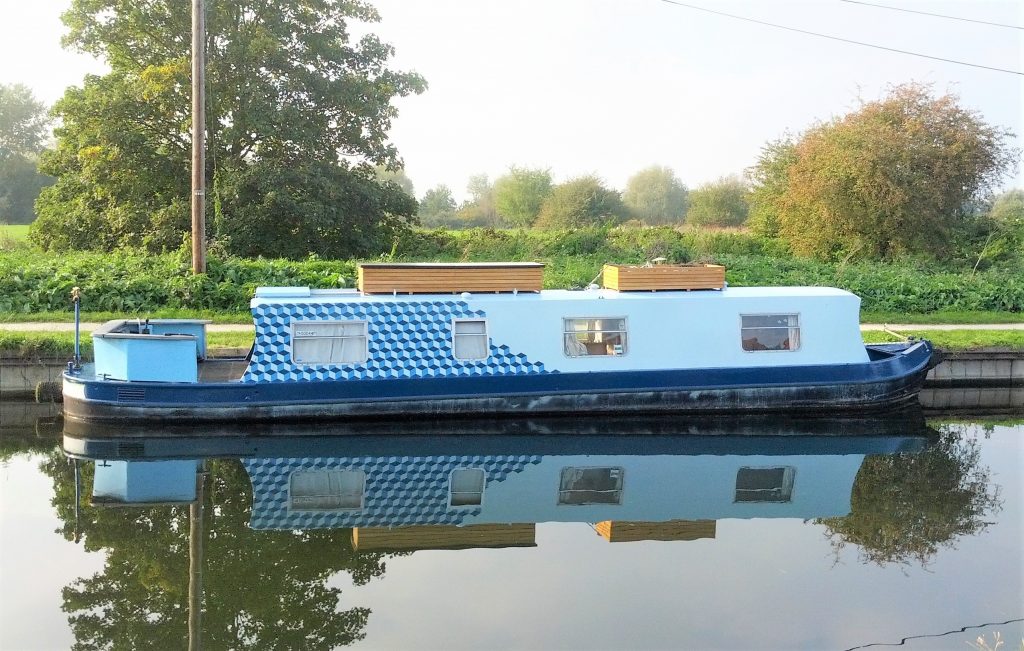
This post is nothing to do with that so, moving swiftly on, today’s blog will be a little bit about readying boats for sale (not sail, if you go out in to open waters with a narrowboat then best of luck to you, but it is a seriously silly idea unless very well prepared). I do hear people talk about flipping boats in the way they do houses, and you can probably make a few quid doing this. However, unless you are doing the labour yourself and can add value at a greater per hour rate than you’d earn doing your day job then I would be wary of looking at boat renovation as any kind of gold mine
That said, people will want to sell boats. Be it a project
that has come to an end, moving on to a different boat or, heaven forbid, on to
land, perhaps you’re going to move in with a partner and you’ve lost the coin
toss and your boat is the one to go under the hammer. Whatever the reason, you
may be looking at sprucing up your boat pre-sale to either add value or improve
saleability.
The most important thing is going to be the same as with any house or flat and that is declutter. We all know boats aren’t the mot spacious places to live so best to maximise what space you have. If it’s full of your junk, then it’s never going to look appealing. So, get us much out as you can, get it organised, get it clean and clear and you’ll be halfway there.
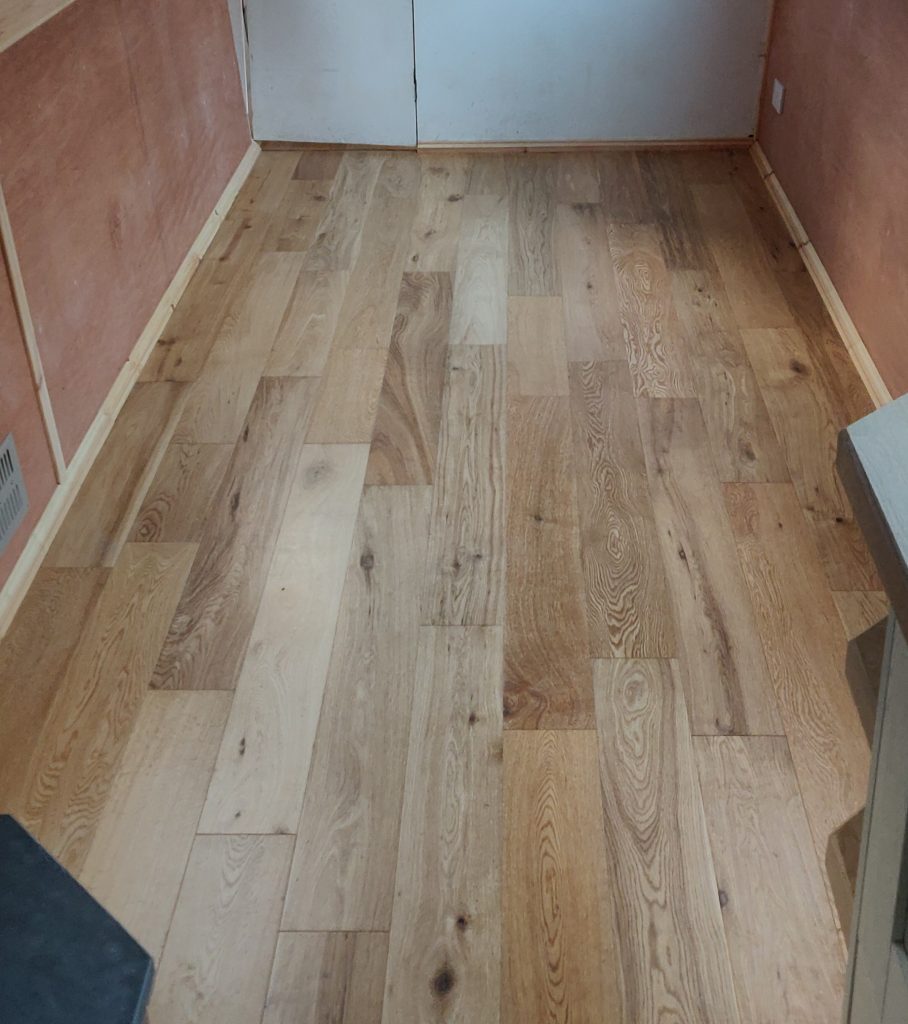
The cheapest fix and the easiest, for those with less advanced DIY capabilities, is a good coat of paint. While I wouldn’t suggest trying to cover a boats problems with a layer of emulsion (for a start it’s a boat, let’s push it out and go acrylic ay?) simply repainting the interior can go a long way to brighten and revitalise a space. The veneer throughout look can seem very dated and the yellow varnish and stained walls will often look great with a decent bit of redecoration. If the veneer and trims still look good then a wood and paint mix, e.g. panels painted and trims left or an above below gunwale split, can give a much more modern look but retain an aquatic favour
If you’re going to do further improvements, then I would
suggest leaving the painting till last. You don’t want to ruin your good work
with a load of other work going on. For my money then paint/varnish is the
final thing, the icing on the cake.
Look at how you’re using your space. People love some clever storage. What about some chunky floating shelves or a new cupboard to use a dead space? When I first moved on to a boat I was amazed at how my van load of possessions quickly disappeared in to the nooks and crannies of a boat. Again, if you’ve got cupboards and shelves a plenty, why not repaint tired old doors, keep it simple, or, add some colour. White and white is the rule for houses but I think that a bit of character sells a boat. People aren’t looking for that same beige life experience that they want with a half million one bed flat in Hackney (75% now sold, buy buy buy!!)
For those of a more daring disposition then the real gems of a boat are often the bathroom and kitchen. Done well they really make a boat, if they are damp, mouldy and smelly then there is nothing surer to send a canny purchaser running for the hills. It is a bigger endeavour to redo a whole bathroom or kitchen but there are some easier fixes if you don’t want to rip everything out and start again. Replacing the kitchen doors, worktop and sink and you have a new kitchen. New tiles and a new vanity unit in the bathroom and it can look like a whole new room.
I do feel that if you are getting somebody in to do the work then you are unlikely to add more value to the boat than you are spending, it is just the same in houses. Good quality work is not cheap and while it will increase the value of the boat you shouldn’t expect to make a great net gain. That said, what you can get is greatly improved saleability. With the market in boat sales having taken a slump over the last year (anecdotal only, don’t expect me to back this view with evidence) then having something to make your boat stand out can help get it off the shelf. The world and her wife are all in the boating game these days and the number of boats for sale in London and round the country seems to be increasing near exponentially.
When I bought my boat I fell in love with the head room, the feel, the value and the ‘well put togetherness’ of it. I looked at hundreds of boats online and tens in person before finding the one for me. I don’t know if I’ll ever finish it, let alone sell it (edit: since writing I’ve made good progress, possibly helped by sharing her with a partner these days.) Should I sell I know I’ll never recoup the value of all the hours I have put in. I shouldn’t say, but at the end of the day I think a lot of us would rather sell to somebody who we think is going to love our boat the way we did, over the person who is going to pay the most. Still, we do what we can to try and get value for what we are offering and boating is becoming more and a more a commercialized area.
Final thought, pick your battles and make it stand out. Do
what you can yourself, that which you can’t get an expert to do it well.
Quality shows and people love boats in a way that I feel houses rarely achieve.
We all hear the horror stories of people buying lemons but most people selling
boats are decent and most people buying them are looking to love and own that
boat for many years to come. A well looked after boat with a few stand-out
features is always going to have value.
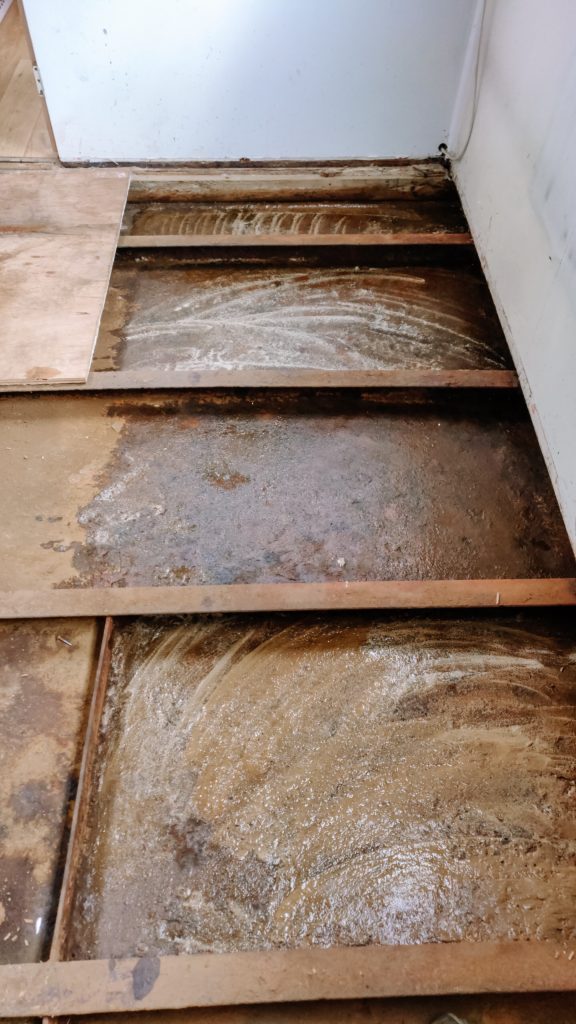
I often get asked if we can come and replace or repair a patch of floor. Typically, something like, “Oh, there’s just a small spot that has gone a bit spongy. Just needs cutting out and a new bit sticking in. Could you help?”
This
always sets alarm bells racing. Why is a bit of the floor squishy? What is
causing it, and worse, what is now underneath? It would indeed be a small job
to cut away a little bit of board and replace it, but this is rarely what is
required. It is more often the symptom of a much more problematic situation,
one that I shall try and give you some advice on dealing with in this post
The reason that this is often such a costly job is not because of any great skill required in dealing with it, but because it is often a very widespread issue that will require a lot of time to resolve. Potentially moving (removing) many items and carrying out a lot of grotty and lengthy works. If you want to DIY it, you can save a packet. The work involved, for the large part, is not too taxing, just time consuming
I shall
break this down in to a few sections in order to make this guide as useful as possible.
Each section will contain an outline, some suggested steps, and some tips and
tricks on dealing with what you may encounter. They will be,
Finding the issue
Preparing for the work
Sorting the bilges
Standard
Disclaimer; We take no responsibility for any work you choose to undertake.
While I hope this will be of use to people anything you read here is purely
personal opinion and you should not undertake any work where you do not know
what you are doing. If in doubt get a professional! All boats are different and
anything written here should not be taken as universal
Finding the Issue
The
first question when anybody says there is a problem with damp is where is the
water coming from? This may seem daunting, but there are only so many places
that it can be coming from and we can trouble shoot our way through. We are assuming
here that your boat is designed with a dry cabin bilge. If it is designed to be wet then water in the
bilge will not be as useful of an indicator, though depending on certain known
factors, like the weather, you may still learn something if the level of water
is changing when not expected to.
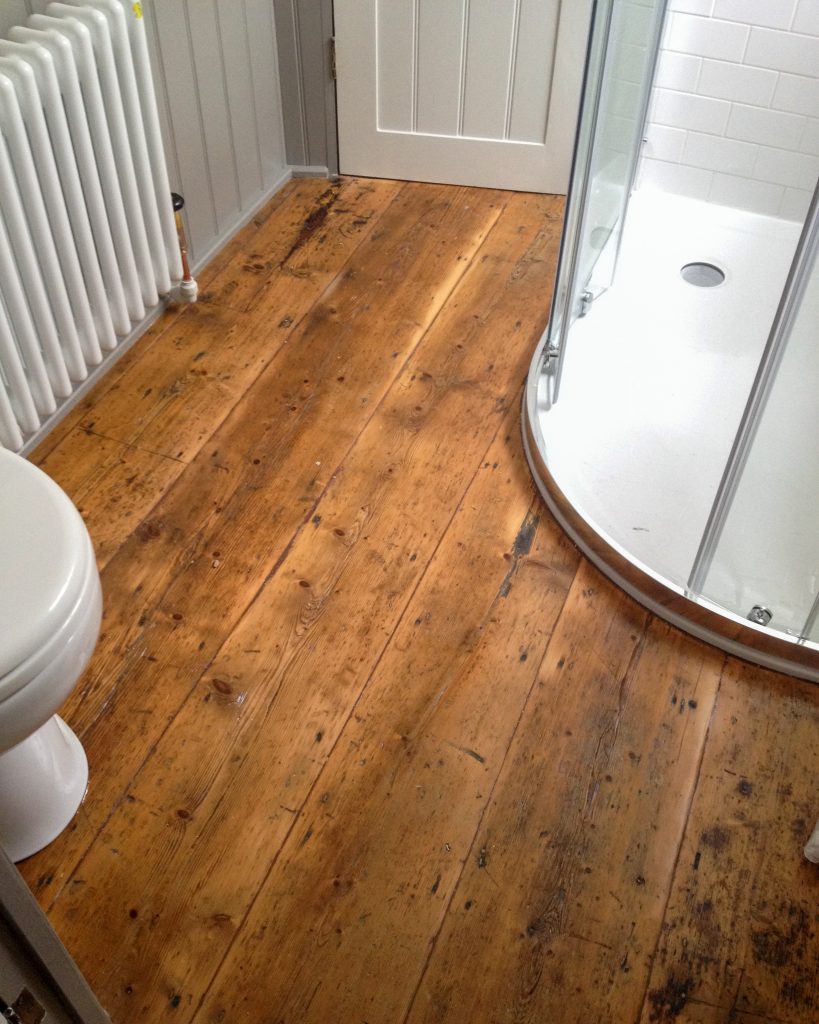
For now we’ll assume that you’ve lifted some boards in the effected area and/or lifted inspection hatches (typically found hidden away in corners, sometimes beneath furniture) at the stern of the boat) and found water beneath. If there is a particular wet area, beyond just the bilges at the stern, then searching locally for the leak is going to be a good starting point. Water will run ‘downhill’, so things nearby or in front of this wet area are likely culprits.
You
might be wondering, is the water coming from the canal? Short answer, probably
not and if it is then this is not the guide for you. If your hull is
unsound, or you suspect it may be, get your boat out the water and get a professional
to advise you. It is rare that this is the case if you’ve had a survey,
though we have been working on a boat that has sprung a leak! If it is possible
to pierce the hull with a scraper or the like, then the hull needs professional
attention. As such, let’s just discount
this for now until you have excluded all other possibilities
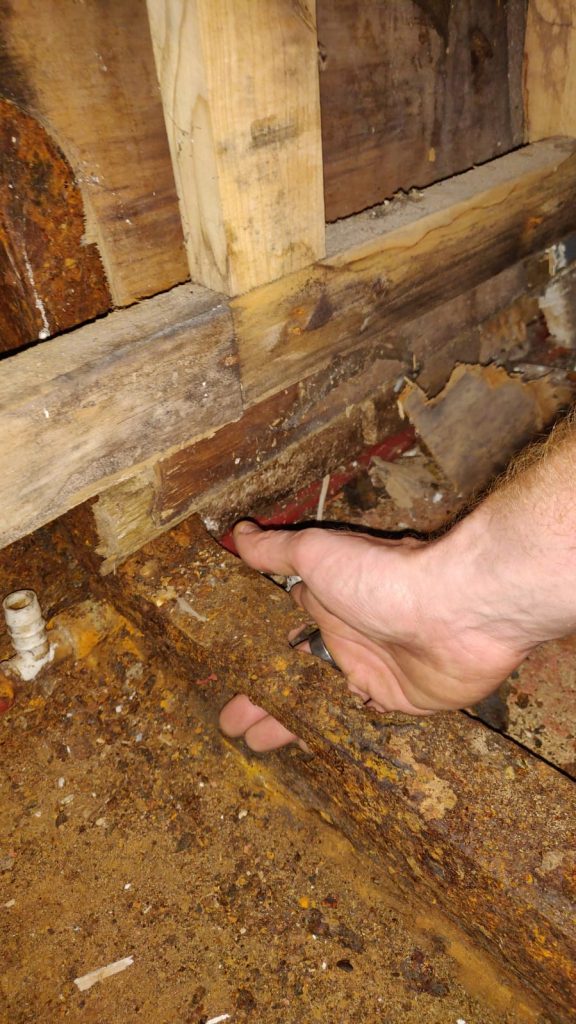
Is it
coming from the plumbing? This is one of the major causes of a build up of
water. It can often lie unnoticed and rot away timbers and rust bilges unseen
until the problem has gotten much worse. An understanding of water systems on
boats will help you track down issues here, but we will run through some potential
areas that it could be
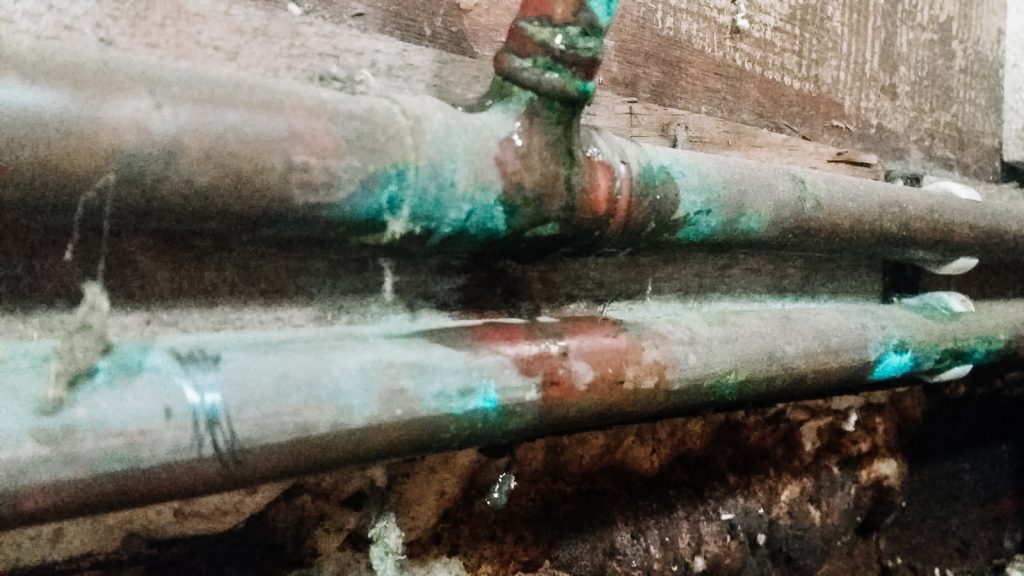
Water comes from your tank and is then put under pressure by a pump. Any utility using water will be connected to this pressurised system so we can tell if there is a leak between pump and outlets as the pump will come on when there is nothing being used. So, pump running when it shouldn’t be equals a leak in the ‘live’ side of the plumbing. Once you know this, then it’s a case of tracking it down and fixing it. It’s more often a joint than a straight run of pipe so check any connections. Pipes, particularly copper pipes, can split if left full and allowed to freeze in cold weather as well, though this would probably cause a more noticeable leak than just a slow drip.
It
could be the water is escaping from somewhere after this. Typical things to
check are shower and sink wastes. This might be identified by damp or mould local
to one of these. Drying thoroughly and then running water through with a paper
towel beneath will allow you to check for minor drips. Any joints in pipes
running from these should also be check, with particular attention paid to
anywhere there is negative fall as water will sit here and have more chance to
work it’s way through any weak points.
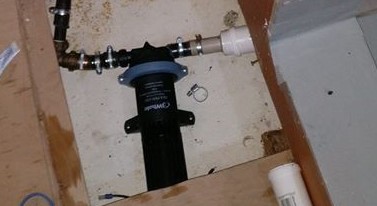
The skin fittings on boats are another week point. Integral welded steel
outlets on older boats may have rusted through with time, this happened with
the shower on my boat, a late 90’s cruiser stern
If in doubt you can eliminate the plumbing completely by isolating it (or draining it) from the boat and seeing if the problem persists. If it does then this would suggest that the water is coming from outside the boat. Again, we are assuming that this is an above the waterline issue. Is the problem worse in wet weather? Then it’s probably coming in through a weakness somewhere in the shell. The ‘weak points’ are anywhere the shell has been cut through, in particular, windows, mushrooms, chimney collars and other vents and outlets. Doors and doorways could also be to blame. Rust, damp or mould down the wall beneath the cladding might lead you to the offending article. It is worth giving the exterior of the boat a thorough visual inspection. I have also known water to get in from wet bilges, such as an engine bilge, when bulkheads have rusted through to the cabin bilge. While I am not going in to detail on how to fix the multitude of issues you might discover, I will perhaps cover some in future blogs, I will give a shout out here to ‘Captain Tolley’s creeping crack cure’. This can be a handy fix for certain hairline gaps on boat exterior, at least for a temporary fix.
I feel
I should also mention condensation. This gets put forward as a source of water
in the bilge and can be a problem, though I have not seen many cases where
condensation is creating a significant build up of water. It shouldn’t be completely disregarded, but I
would look for other culprits first unless you have a lot of bare and
uninsulated shell beneath the cladding.
Preparing for the work
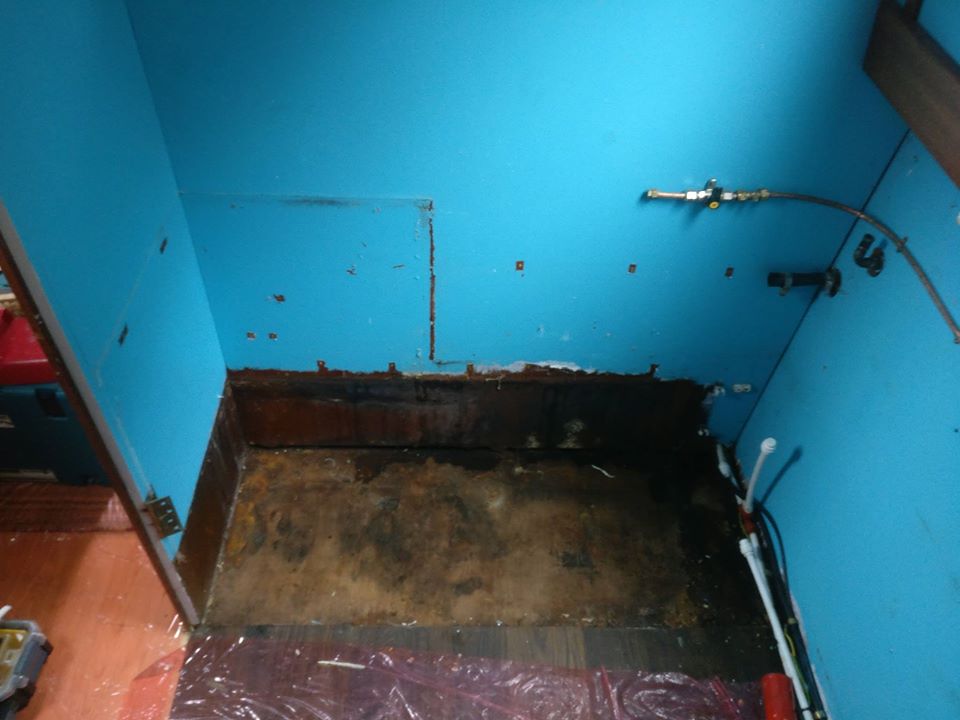
You’ve found and fixed you’re leak. Now you need to assess the damage and decide on a course of action. You should be able to dry the bilge, and have it stay dry. If not, then you may still have an issue. It could be that you have an area of flooring/woodwork that has been affected and a rusty bilge. How much should you do? It is tempting to want to pull everything up and start again, but this may not be practical. Factors such as, how accessible is the bilge, the age and value of the boat, the state of internal fitout, the severity of the damage/mould/rust will guide you as to how much is worth doing.
Rust
looks awful, 1mm of steel becomes 10mm of rust! When you first look at a bilge
that has gotten wet it can be quite frightening. If you are in doubt, then seek professional
advice. A surveyor will be able to help you gauge what is problematic and
what is just cosmetic. Mould should be
dealt with as this can be bad for the health and residual damp and mould can
affect surrounding woodwork.
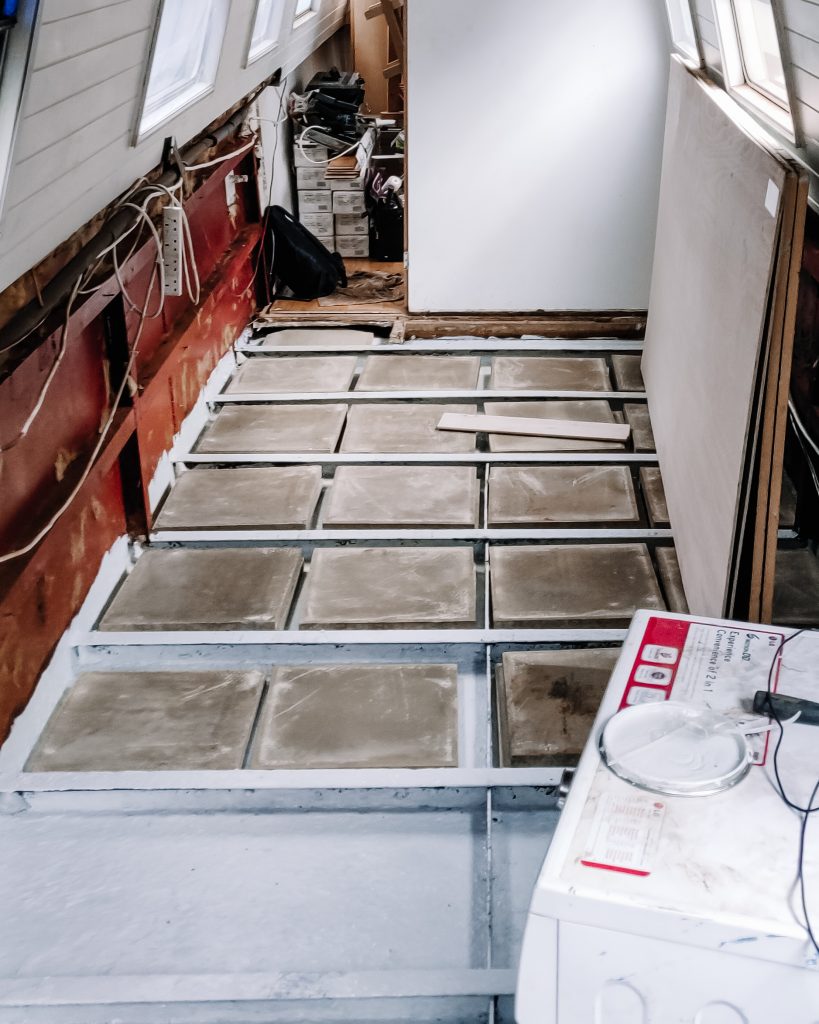
This boat was overplated, this is severely rusted!
If
there is relatively little in the way of fitout and bulkheads it may be simple
to lift everything for access. If the
opposite is true you might find it very difficult to lift boards which are
pinned down by walls, kitchen, bathroom, tiles and all sorts of fitted
furniture and the like. Perhaps you can
cut out the rotten area and replace, then deal with the rusty bilge locally and
at the stern. If the rust is not too
bad, you can possibly just dry out the bilge and trust that it will remain
relatively dry in the future so that the rust will not significantly
increase.
Ideally you want to remove all rotten wood and clean, treat and paint any rusty sections of bilge (and walls of the shell if effected). In extreme cases this can mean removing the boats fit-out completely. If this is required then a dock with covered storage is the best situation, but it might be possible to deal with half a boat at a time and do it this way while on the cut.
If there is extensive remedial work to do then it is often as quick, and probably more sound, to remove whole panels of wall and floor and replace them. Cutting bits out and bodging them back in will likely leave a creaky floor and messy looking boat. Not to say it can’t be done, but by the time you have done a proper job of cutting out a piece of flooring, patching it and making good you may have been able to just take out the bulkheads and lifted the whole lot. This also makes it easier to support the flooring properly. I will cover floors, sub floors etc in more detail in other blogs
We are mostly dealing with bilges here, though the same techniques can be applied to other metal elements of the shell, so I will leave the woodwork to one side. The flooring, and subfloor will want to come up and then any ballast will need lifting. It is difficult to really get a bilge bone dry until anything is removed and it is fully exposed. Even then, if there are thick layers of rust this can trap a lot of moisture. You will want to dry out ballast before putting it back in, unless it’s pea shingle in which case bin and replace with slabs! Care should be taken when removing a boats ballast. Narrowboats are inherently pretty stable (wobbly, but unlikely to capsize), but do be aware that moving/removing ballast may affect your boat and it’s position in the water
Top
tip: If you are going to remove sections of the fit-out, take lots of photos
and notes while you do. It is easy to forget how everything went together when
you come to put it all back later on
Sorting the Bilges
By
this point you should have full access to all the areas you want to deal with.
Like I have said, we are discussing the metal work here. Some of the carpentry
elements you will find dealt with in my other blogs, but the spectrum of work
is too wide to cover here satisfactorily.
I would
mention again, rust can look much worse than it is, but if you are unsure of
the integrity of the hull then seek professional advice. The next step is to physically remove as much
rust as possible. Rust is an oxide of steel
and is unusual in that it flakes away from the surface of the metal where many
other metals’ oxides adhere to the surface. Take for example aluminium, a
highly reactive metal that is protected by it’s oxide coating. Sadly, this is
not the case with steel and rust and you will want to remove as much off the
loose rust as possible
For DIY
purposes I would suggest starting with giving the entirety a good going over
with a scraper and then sweeping up the loosened rust. Be aware that dealing with
the rust is probably the messiest bit of the whole job and you should take care
to wear appropriate PPE, including but not limited to goggles, mask, and probably
a boiler suit.
If the
area effected is large and the resources are available, then it may be
practical to mechanically remove the rust with a needle gun or with blasting. It
is best to seek professional advice if you want to do this so that you can be
advised on the suitability of these techniques.
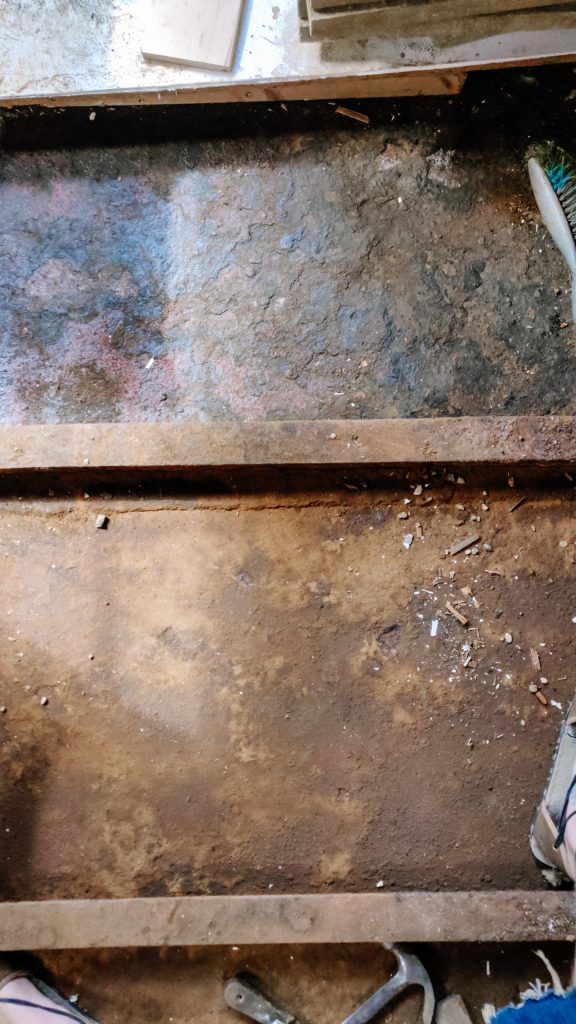
Once
the area has been scraped over then it will need a thorough brushing with a stiff
wire brush. This can be a hand brush or a drill attachment, either way it’s
dusty, horrible work to do so masks on! Sweep away whatever comes off and
hopefully you will have a surface that is beginning to look a little less
shocking.
You won’t be able to remove all the rust (unless blasting of course) so the next step is very important and should not be skipped. A rust converter should be used on the entire surface. There are a few different products and it is to be noted you will likely want to order these in advance from the internet as they are not readily available in shops in useful quantities (you might try Halfords and Toolstation, but better to go online). Fertan and Vactan are both popular, though check whether the product you are using needs washing off after application as this adds an annoying and, I feel, unnecessary step. My personal favourite is FLAG rust converter and primer as this can be painted on and left and leaves a primed surface ready for topcoat.
All of these converters work in the same way, they change the red oxide into a black oxide which is stable and will remain stuck to the steel. Don’t ask me the science of it, I am sure that is available elsewhere on the internet. The idea is that you want a stable surface to apply your new finish too, otherwise rust underneath your paint might damage the surface and lead to water being able to penetrate and further rust the metal
You
could stop at this point, but I feel if you have gone to all the trouble then why
not future proof it? You aren’t going to
want to get back in the bilge any time soon and if you put a decent topcoat on
then you will have a much better level of protection should you have any leaks
in the future. My personal choice is
Manor Coatings Zinfos 340 WS. You can get this online or from many auto-motive
paint suppliers. It is one-part primer topcoat with a anti-corrosive. I like to
think of it as Hammarite for grownups. It is cheaper and can be mixed to any colour,
so why not. I like a light cream or grey, so that you can easily see oil, rust or
any other issues in the future, but whatever floats your boat (if you’ll pardon
the pun)
Two
coats of Zinfos 340 and your metal work should be fairly bomb proof (not literally
mind). After this you are all set to
replace the ballast and begin rebuilding/re-fitting the innards of your
boat. Assuming you have taken things out
with care and have good records of how it went together then this should be a
relatively pain free exercise. You’ll likely be replacing your subfloor in part
if not in whole, exterior grade ply here is fine but some people like to be
belt and braces and stick in marine grade. This is fine, though it is pricey
and very heavy.
Well,
you’ve finished. You might not be able to see you’re handywork but now you can
sleep soundly knowing that you’ve done a proper job. Why not relax from your
hard days labour and check out some pictures on our Instagram feed or see some
of our projects on our website. Until the next time