If you have read the full Measuring Guide, then use the Measuring Quick Guide below as a reminder, otherwise go further down for the full guide.
Measuring Quick Guide
Check the distances across the space being measured and check the square. It is easiest to choose a datum point and work back from there. Hard to measure dimensions can be calculated from these bigger measurements. Make sure you leave enough tolerance, mm perfect it is asking for trouble in a space that is probably not square, typically allow 5 – 10mm tolerance. Don’t forget, you can get some help with maths and angles from your phone.
- Measure multiple points around the space
- Keep your tape measure straight
- Get help from a second person if possible
- Allow some tolerance to ensure fit
- Check the space is square and straight
- Find a datum and work to that
- Use your phone for a triangular calculator and/or angle finder
Measuring Guide, The Full Details
You should read this at least once, but you may find it useful to read every time to ensure your product is a perfect fit for your project.
Much of this article may be obvious, but I will try to be thorough so that it covers all levels of experience. With the launch of our made to measure products, it is important that we receive accurate measurements so we can produce items to meet your exact needs. This guide will explain what to measure, how to measure it, and some tips and tricks to help.
All our measurements are taken in millimetres. We work in millimetres and metres, depending on scale, and this way there is no confusing measurements. Any dimensions you give to us will be in mm.
Illustrations have been given where I think it would be helpful. The issues in question have been exaggerated for clarity.
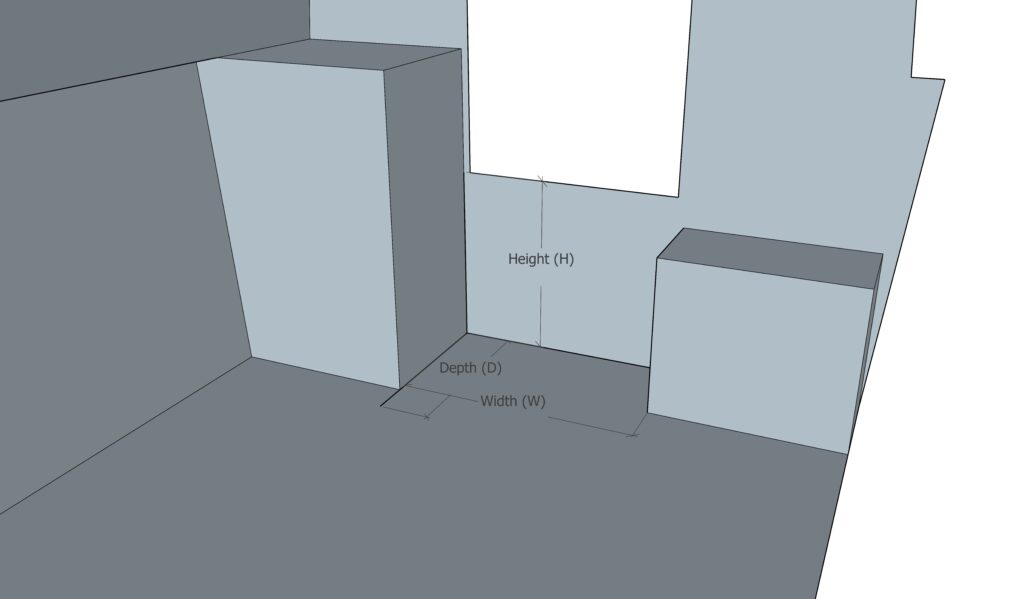
Height, Width and Depth
The three main measurements are going to be external dimensions. Typically, you will be measuring a space that your new steps, shelves or other will it into, though some products will include additional dimensions.
Width (W) – The distance side to side
Height (H) – The distance from bottom to top
Depth (D) – The distance from front to back
(Fig A)
How to Measure
Accurate measurement is dependent on technique
- Use an accurate metric tape measure. Most tape measures, even cheap ones, are accurate but if in doubt double check against another tape or measuring device
- Get help. A second pair of hands is helpful in holding a tape straight and in place, particularly for longer distances
- Measure in line. If the tape measure isn’t in line with the required measurement (Fig B) then there is a danger of recording a longer measurement than is there
- Measure straight. A drooping or bent tape measure will also give a longer measurement than is true
- Measure twice (or more). Double-check your measurements, if the same measurement is coming up very differently then something is going wrong
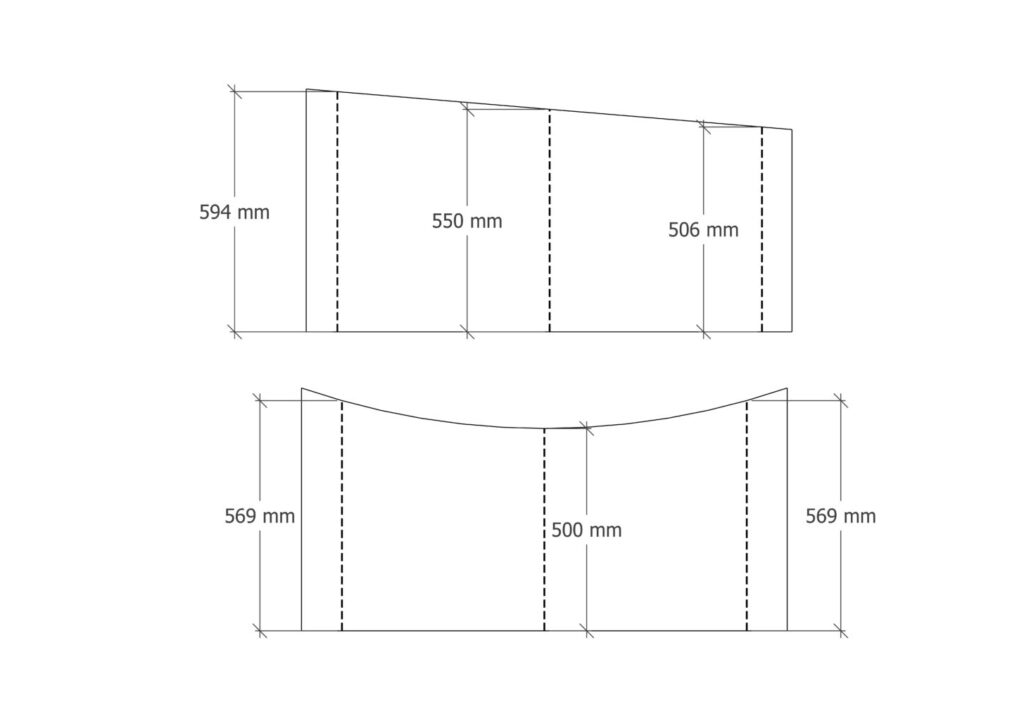
- Measure in multiple points. Boats are not square or straight, measurements may vary or taper across a space (Fig C1+C2)
- Try to measure off, and/or along, other points. Floorboards, trims, walls etc are not guaranteed to be straight and true, but they can help guide you and keep your tape measure straight. Plus as your furniture will be sitting in relation to these then a relationship between the two is often desirable
Tolerance and Square
Boats are rarely square, and so it is important to check the measurements in multiple points and to allow some additional tolerance. The dimensions may taper in on one of them, and we need to know the smallest point, plus allowing some additional amount to allow for inaccuracies in measuring or small differences in manufacturing.
Typically, an allowance of 5-10mm or so off the smallest dimensions is enough, but if there are big curves, or the space is very out of square, then you may need to allow more. If you are unsure, then get in touch with any questions you may have.
Tolerance is most important where there are two solid surfaces to fit between, and any inaccuracy will mean an item may not fit at all (Fig D)
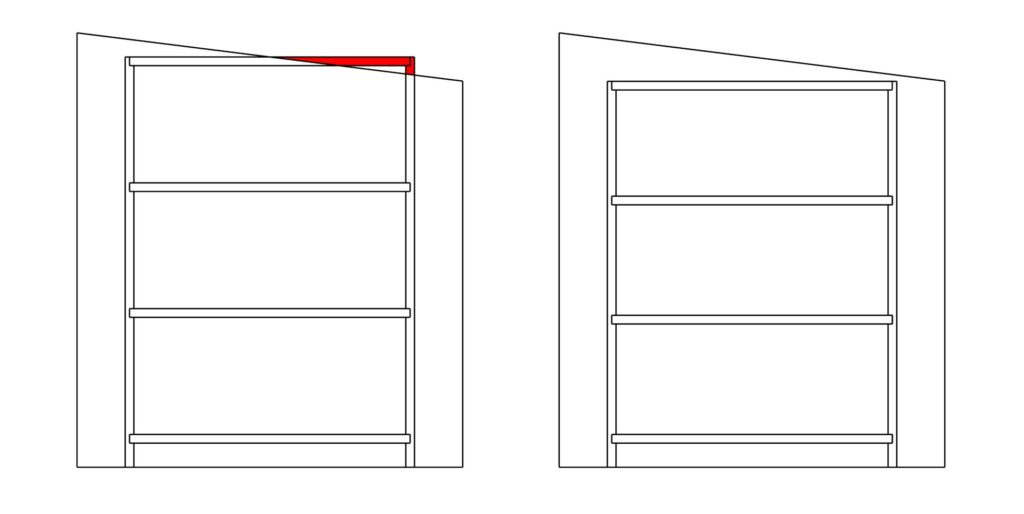
Boats are rarely square, so checking the square of your space can be helpful. Square means that two sides are perpendicular (exactly 90 degrees) to each other. If the angle is smaller or greater than 90 degrees, then you need to allow for this. We do this by taking the smallest dimensions (Fig E)
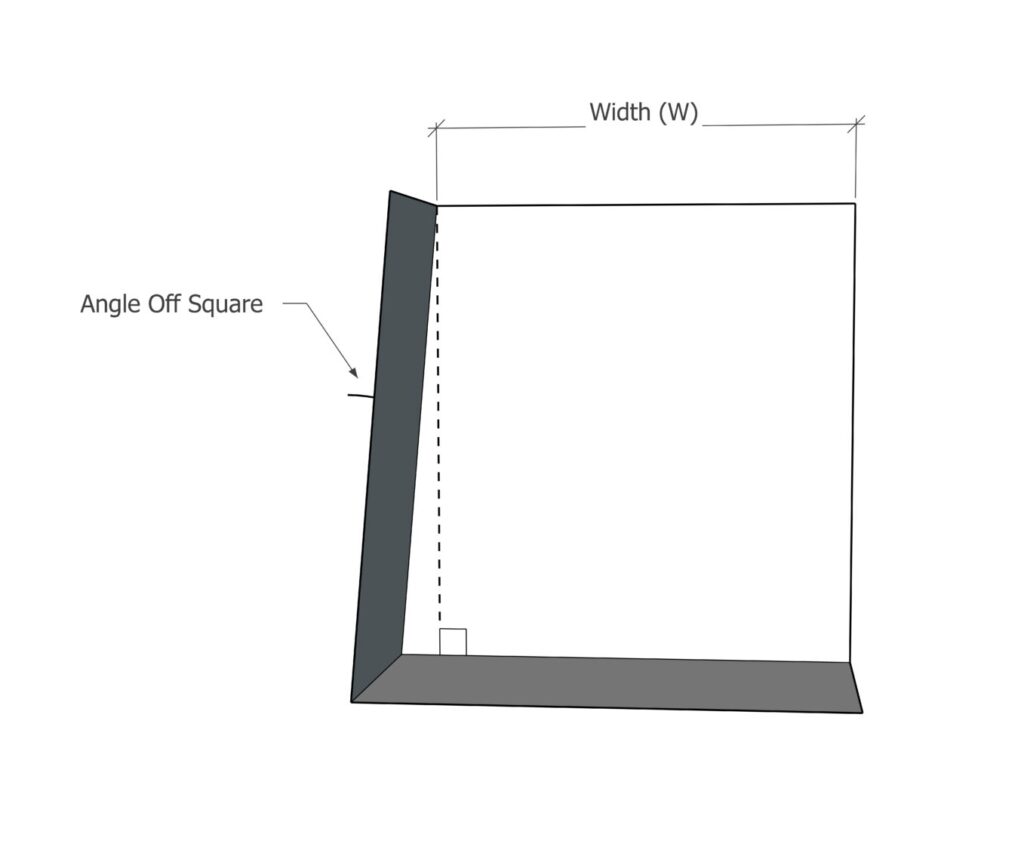
You can check if something is square in a number of ways
- Use a square. Ideally a large square (like a roofing square) as a small square may just be measuring a curve, or deflection, in a side and not the true relationship of two sides
- Improvised square. Many day to day items are already square, or close to. For the purposes of checking a rough square then a factory produced item, like a kitchen cupboard door, may be used. Or another piece of furniture, providing it is well-made and square.
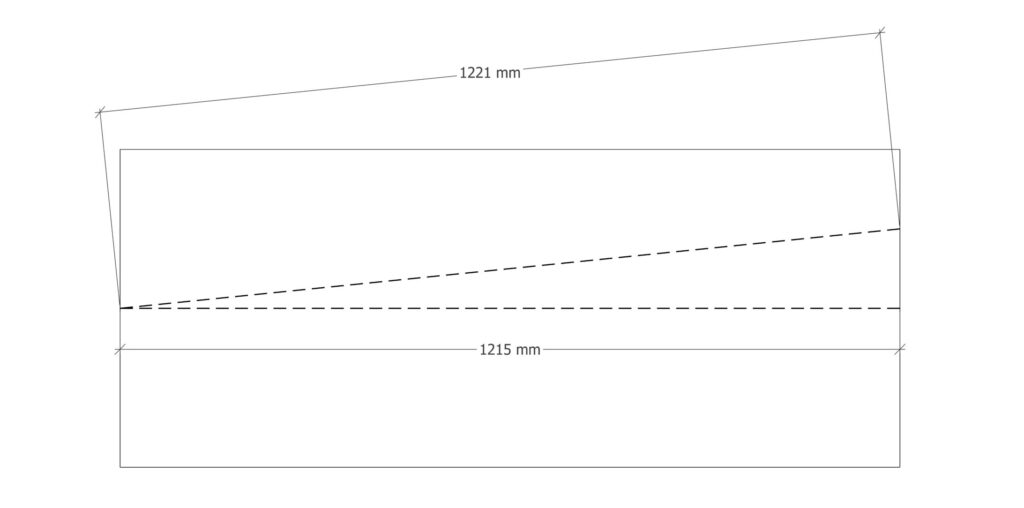
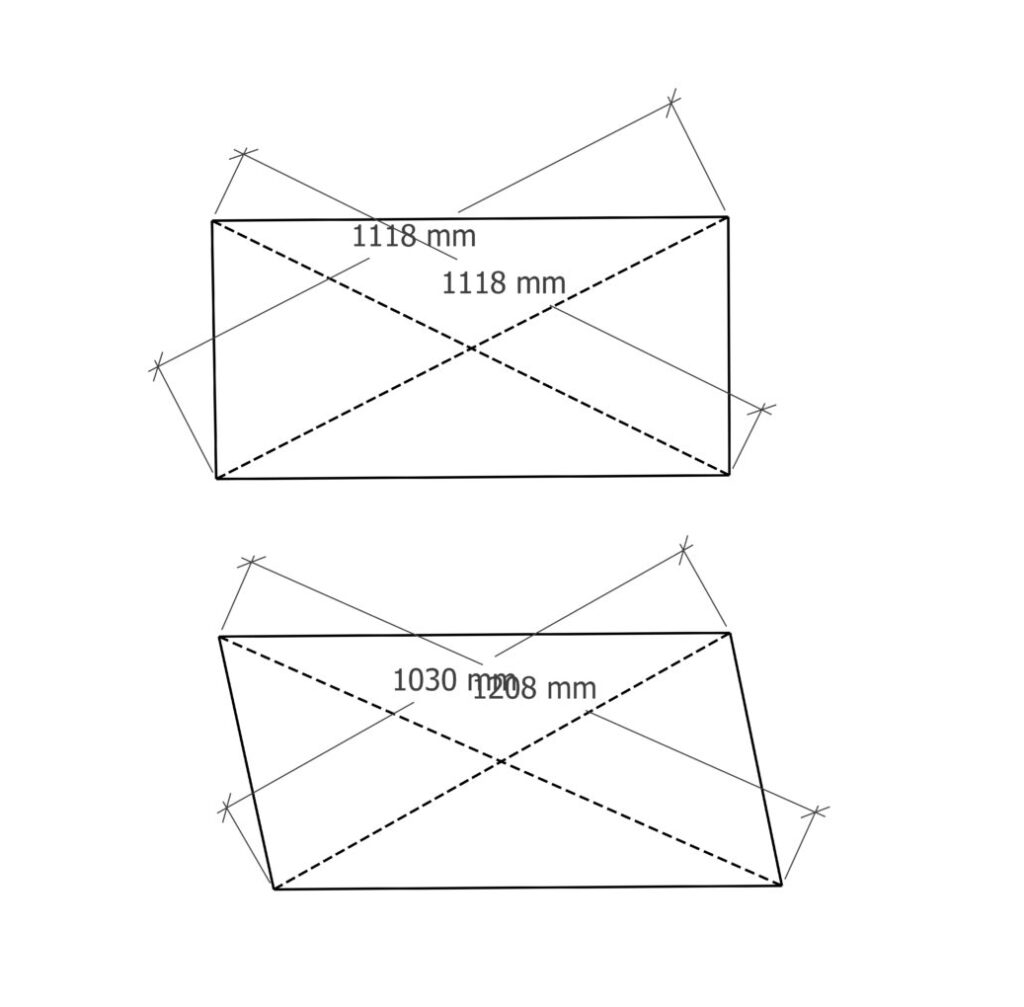
- Measuring diagonals (Fig F). If you measure the diagonals of a square or rectangular space, then both should be the same. If they are not, then it isn’t square. This can be difficult to do accurately and is easier with somebody to help.
Recording Measurements
I find it easiest to draw out the space, add in dimensions as I measure them, and then take my final measurements from this. These days, I typically do this with my laptop and CAD software, creating a 3D model of the space I can later work with. You can use a free version of Trimble Sketch up Online if you’re feeling adventurous, but a paper pencil is fine.
Once you have all your dimensions, allow an appropriate amount of tolerance on each dimension and input these on our order page.
Differing measurements
Some of our items allow for two measurements (e.g. depth top and depth bottom) and/or angles to be put in. Measuring these can be a little tricky, but with some care they can be done accurately.
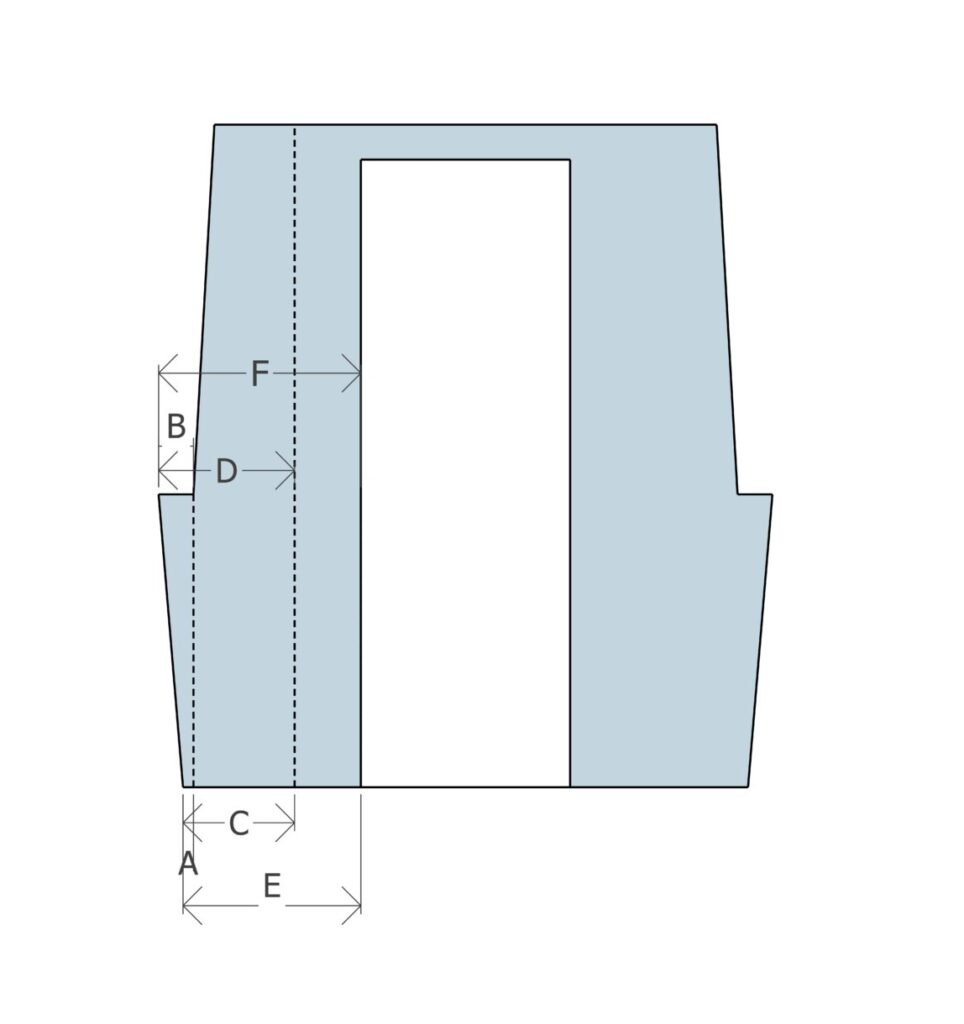
Where you want to measure a different dimension at two points, you need to decide where you are measuring from (the datum). Once you have a datum, then you can measure back to the desired point.
An example of this is measuring the top and bottom of under gunwale shelving. It may be that there is a door or a board on a bulkhead that you can measure to. Perhaps there is a trim running vertically that you can use.
- A is hard to measure, there is no way to know where it is as the floor has no markings to show a straight plumb/vertical line from B. We may be able to measure to a trim (C+D) or doorway (E+F) or add some other datum of our own, e.g. with masking tape. To get A then
- A=B+C-D, or, A=B+E-F
Use this Measuring Guide Basic Calculator to help, if needed.
Basic CalculatorIf nothing is available, you might wish to mark a line on a bulkhead. You can use a straight line of masking tape. It may be a good idea to check this for straightness with a string line. Where there is no bulkhead, you might be able to put a box or a piece of furniture in place to measure from.
Where your datum is different to the front of your shelving (if measuring under gunwale shelving) then what you need to do is measure the difference. This difference can then be added back to the smaller dimension to give the top (Fig G). If in doubt, get in touch
Measuring Guide Angles
Angles can be done in much the same way. Measuring two points of difference at a known distance from each other (Fig H) which will give you two sides of a right-angled triangle. Using a bit of secondary school maths, we can work out the angle. If, like me, you don’t remember how to use Pythagoras’s Theorem straight off the bat, then simply plug the numbers into a triangle calculator You can get one on most phone, but the link will give you a free web version.
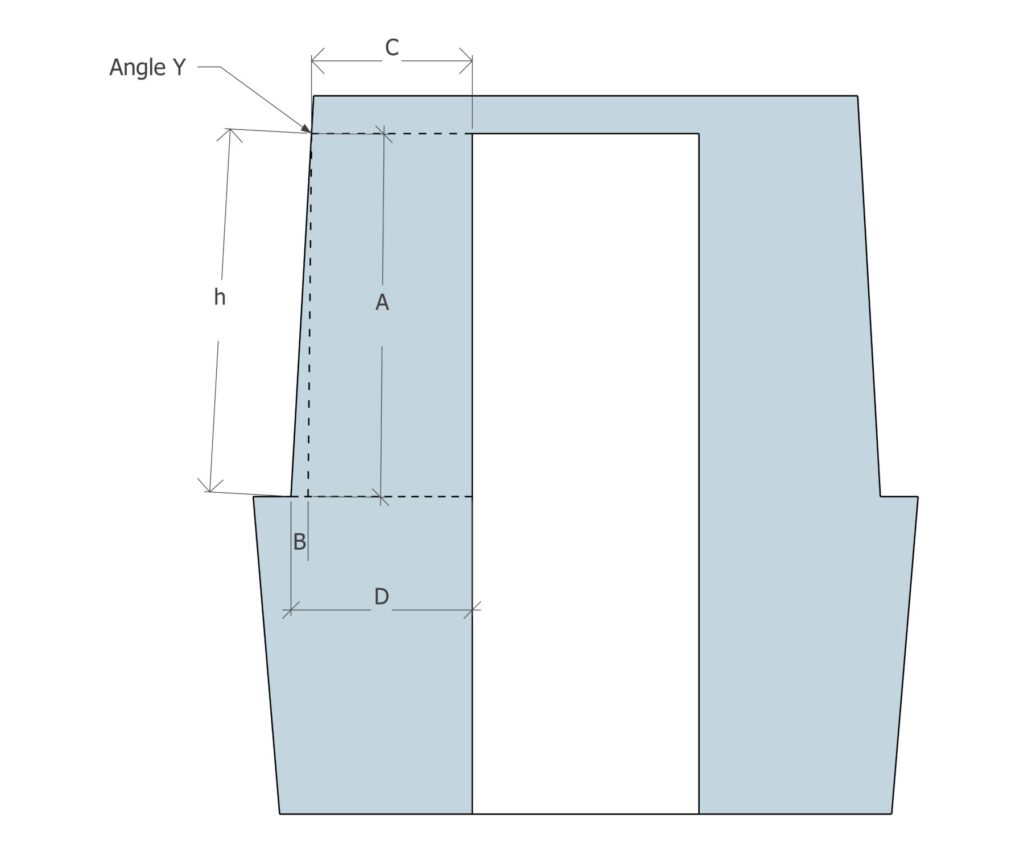
- We have chosen and measured side A. We measure C and D from our chosen datum. B=C-D
- Angle Y= Inverse Tan of B/A
Technology can further come to our aid as you can download an angle finder on your phone. Use this on the angled wall to find your angle. It may be worth checking the angle finder on a vertical or horizontal surface (relative to the surface you are measuring) to check it reads this as 90 or 0. If it doesn’t, you may wish to add/subtract the difference.
To be doubly safe, you may want to use both methods and check they come out the same, or at least similar.
Measuring openings
Some of our products, e.g. under gunwale shelving, allows for customization of shelf positioning. You will be asked to input the distance between the shelves. I think the best way to do this is to think about what you want to put on the shelves, measure some of those items and add 25mm or so to allow for getting your fingertips in when removing items.
Measuring Guide Tips
- Stop and step back. This is the best advice I ever received as an apprentice. Take two steps back from what you are doing and look at it. Your own eyes will tell you if it makes sense. If you put all your trust in tapes, straight edges, squares and the like but don’t step back and look, you can make some easily avoided mistakes.
- For anybody that doesn’t know, spirit levels don’t work on boats! This can lead to some disastrous results where people trust in a level and don’t look for themselves. Equally, a plumb line is not much use.
- Pick a datum. It is very tricky trying to measure all dimensions independently. When I am measuring, I pick a spot to relate my measurements back to.
- String lines, or just a piece of string, can be very helpful. Pulled taught, it gives you a straight line
Measuring Guide Summary
- Measure multiple points around the space
- Keep your tape measure straight
- Get help from a second person if possible
- Allow some tolerance to ensure fit
- Check the space is square and straight
- Find a datum and work to that
- Use your phone for a triangular calculator and/or angle finder
Enjoy more reading in these articles.
- Social Media Posts – Stories – Announcing this is unboxing

- S is for Shelves! See the best ideas
- W is for Wheelhouse, An Awesome and Remarkable Boat Part

- Towpath Talk – Characters of the Cut – January 2026

- New Year’s Sale: Celebrate with 20% Off Everything

- K is for Kitchens – What you need to Know
